

How To Join In The Round Crochet
There are many ways to crochet in the round. Each ane has its own merits and anybody has their favourite. They are not all interchangeable, but one time you understand the 'anatomy' behind them, it volition be easier for you to decide if you can bandy them in specific patterns and how this will affect your work.
In this post, we will look at:
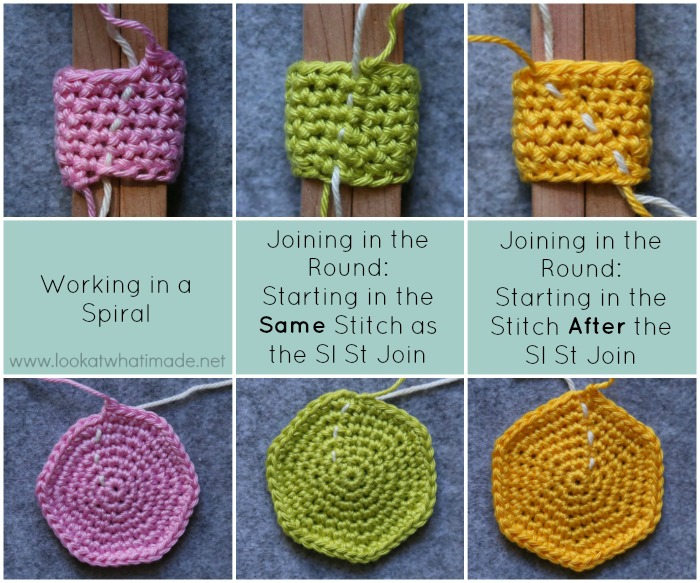
- Working in a spiral
- Joining in the round: Starting in the aforementioned stitch as the sl st bring together (traditional method)
- Joining in the round: Starting in the sew together afterwards the sl st join (how my Granny taught me)
This photo tutorial will show y'all how to accomplish each of the iii methods listed in a higher place. I besides hope to shed some light on the differences between the methods. Lastly, I volition bear on on Interchanging Methods and what would happen if yous use one method where another 1 is required past a design.
All iii of these methods are worked with the right side always facing yous (so no turning at the finish of each round).
Annotation: If you are required to (or cull to) turn at the end of each round, Futuregirl'southward seamless unmarried crochet tutorial is an excellent photograph-laden tutorial.
How to Crochet in the Round
A Guide to Working in a Spiral and Joining in the Circular
First published xvi June 2013. Updated 8 May 2020.
Notes
- If you do not want to read the whole article, you can skip to the relevant department by clicking on the bullet points below under Alphabetize .
- I utilize United states terminology throughout. You tin find a U.s.a./Britain Conversion Chart Here.
- I accept used Running Stitch Markers (RSM) to make it easier to come across the seams. I am a massive abet for them to go along track of the showtime of each round. A RSM is a piece of scrap yarn that you flick backwards/forwards over your piece of work before making the starting time stitch of each round. They form a running stitch up your work, making it piece of cake to spot if you take fabricated a error in a circular. If the line is smooth, yous're practiced. If the line has a jog in it, you've either skipped a sew together or made one as well many. When you lot have finished your slice, you tin can just pull the chip yarn out.
- If you struggle with identifying your stitches and which loops belong to which post, y'all might find it useful to look at this Stitch Beefcake Tutorial.
- For this tutorial, I have started with a 15-ch foundation chain, illustrating the steps by making a small tube in single crochet. Feel complimentary to grab some yarn and follow along with me for a practical lesson.
Index
- Working in a Spiral
- Joining in the Circular: Starting in the Same Stitch as the Sl St Bring together
- Joining in the Round: Starting in the Stitch After the Sl St Bring together – this is past far my favourite method when not working in a spiral. It yields a very neat seam.
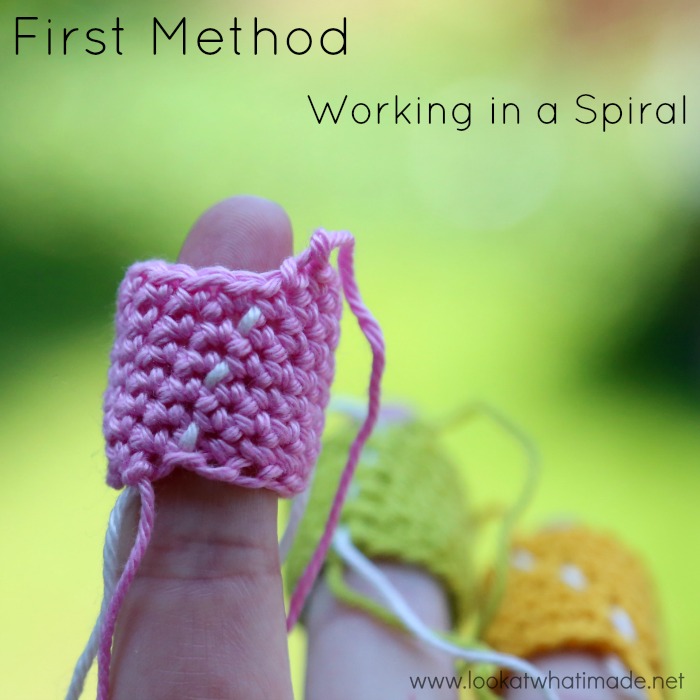
ane. Working in a Spiral
This method applies to absolutely anything that needs to be worked in a spiral, regardless of whether it is apartment or three-dimensional. What that means is that you lot won't bring together the offset and end of each circular with a slip run up or an invisible join. Instead, you will continue effectually, making the beginning st of each round in the outset st of the previous round.
Recommendations
I strongly recommend using a RSM when you work in a spiral as you won't have whatever other prompts/cues to remind you where the terminate of the round should fall. If you are but making a tube, this doesn't actually matter. If you are making something shaped, like a head or a torso for Amigurumi, this can be detrimental!
An example of a pattern written for crocheting in a spiral would be:
Ch 15.Don't plough and don't bring together. Just continue around, working the showtime st of the side by side circular in the first st of this circular.
Circular i: Sc in the next 15 sts. {15 sc}
Round 2: Sc in the next 15 sts. {xv sc}
Method
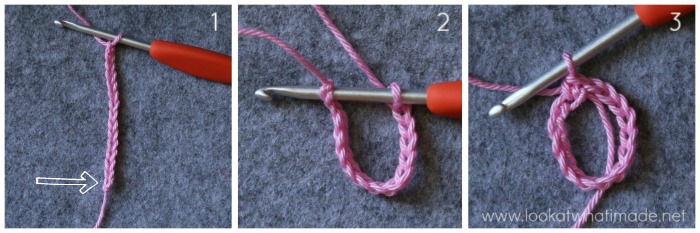
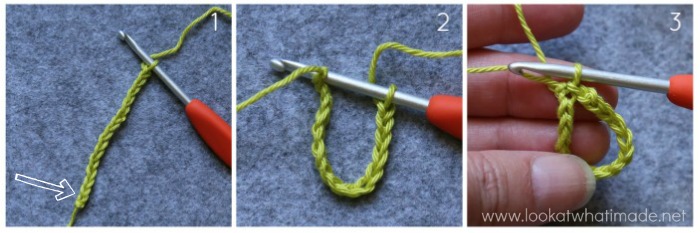
After you take worked your foundation chain {Photo 1}, insert your hook into the first ch (the i uttermost abroad from your hook – indicated by an arrow in Photo 1 and illustrated in Photograph 2) and make a sc {Photo three}.
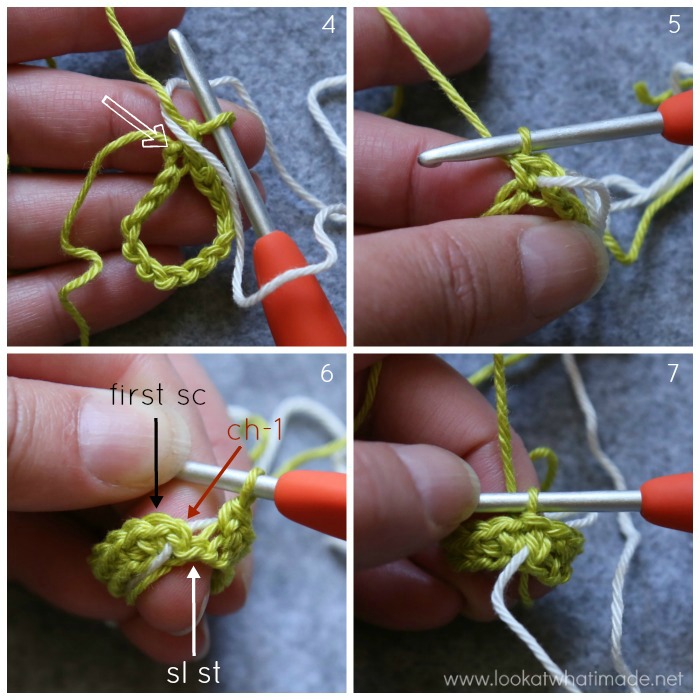
If you are working in a spiral and you want to use a piece of yarn as a RSM, you can only start doing it from the stop of the first round equally there is nothing to hold the yarn in identify at the end of the foundation concatenation. Continue to work each st of Round 1 every bit required by the pattern. Your concluding st of Round 1 should fall in the concluding st of the foundation concatenation {Photo 4}.
Before starting the side by side circular, lay a slice of bit yarn over your work {Photo 5}. Now crochet the next circular, starting in the side by side available stitch, which will be the starting time st of Round 1 {Indicated with an arrow in Photograph 4}. The last sew together of the round should fall in the st to the correct of the scrap yarn (left, if you are left-handed) – meet Photograph 6.

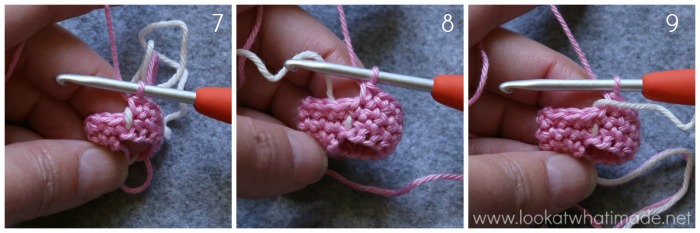
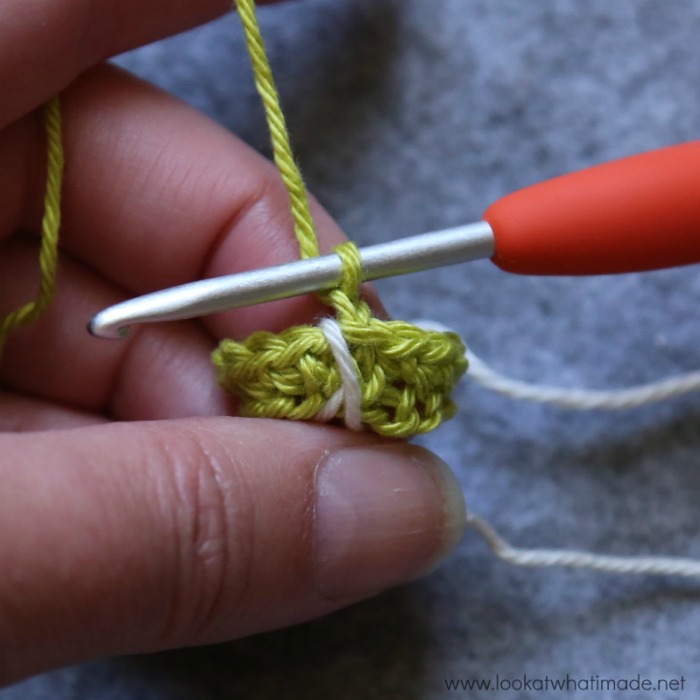
Continue working your rounds, making the first st of every round in the first st of the previous round and flicking your stitch marking back and forth earlier the outset st of each round {Photos 7 and 9}. If you ARE using a Running Run up Marker, it will serve every bit a visual cue that you are even so on the right rails. The last st of each circular should autumn in the st to the right of the RSM (left, if y'all are left-handed) – see Photo 8.
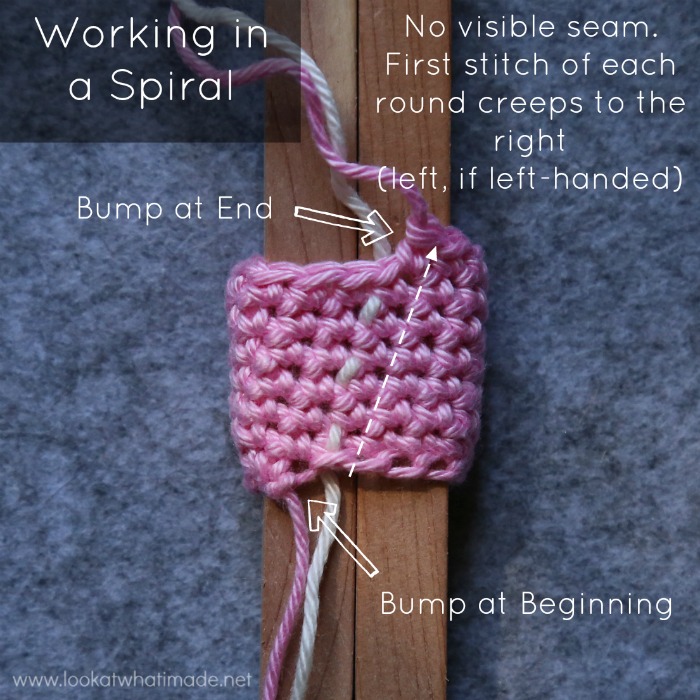
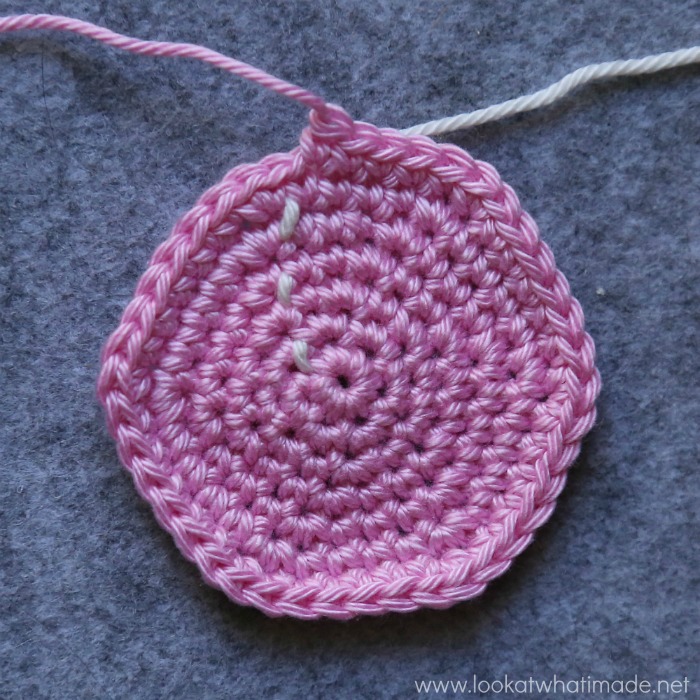
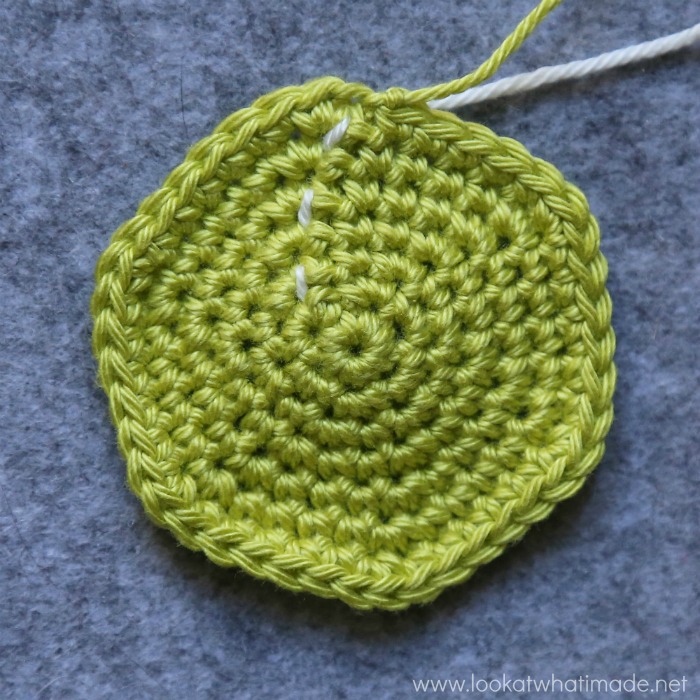
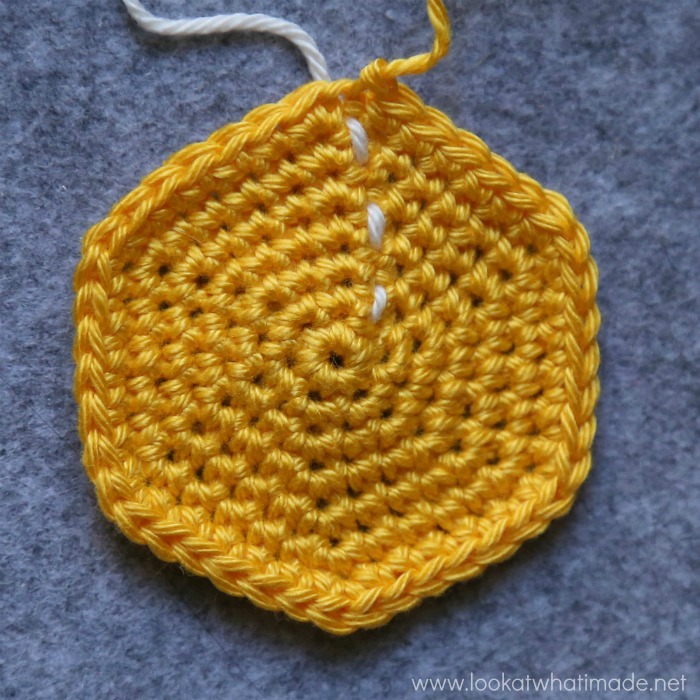
When you piece of work in a spiral you volition not have a seam at all. The Running Sew Marker beneath shows you where each round started. You tin run across that it creeps to the right as your crochet detail progresses (left, if you are left-handed). If there is a jog in this line, information technology is an indication that something has gone awry.
Notation
You can apply this method to hdc, dc, and tr stitches. The only difference with using taller stitches in a spiral is that you may want to 'footstep' the first few stitches of the first round. For case, when starting a dc spiral, I will often replace the beginning 2 dc with a sc and a hdc so that the modify from the end of Round 1 to the beginning of Round 2 isn't every bit abrupt.
Pros
Working in a screw is ridiculously easy. No joining and no fussing. As long as you keep an eye on where your rounds demand to start and stop, you will be fine!
Cons
The down-side to working in a spiral is that you have a bump at the commencement and the end of your piece of work. This does not brand a departure when the piece is sewn onto another piece.
Remedy
I usually just take a yarn needle and thread the initial yarn end through both remaining loops of the last chain sew. This flattens the bump almost as if you had made a sl st.
To go rid of the bump at the finish of your work, most patterns will inform you to sl st in the adjacent st and and then fasten off, making the bump less noticeable.
2. Joining in the Circular: Starting in the Same Sew together as the Sl St Join
For the most part, this method is completely interchangeable with working in a spiral equally the first st of each round creeps to the correct in both of these methods. So, if you have a pattern that calls for joining in the round, you can just as easily ignore the sl st join at the end of each round and the ch-i at the first of each round and just continue working in a spiral.
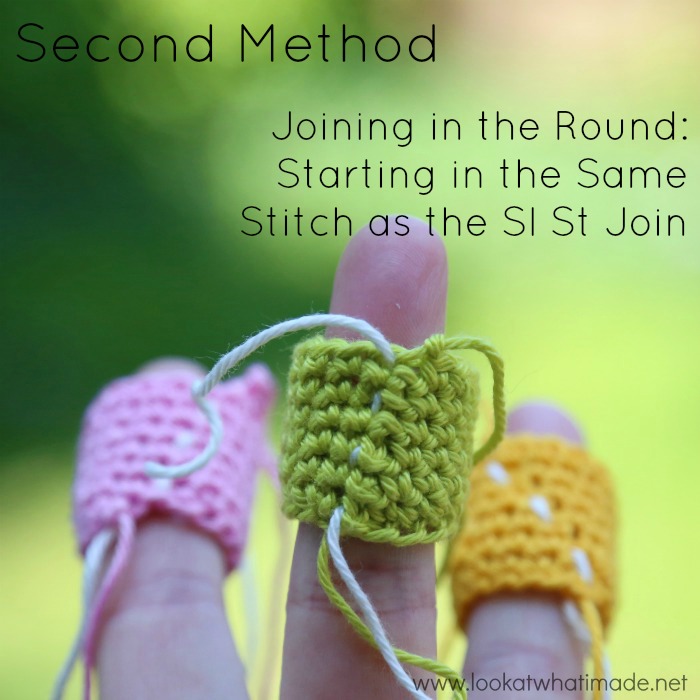
This method applies to admittedly anything that requires you to join in the round, starting each round in the aforementioned stitch equally the sl st join.
An case of a pattern written for crocheting in the round in this way would exist:
Ch 15. Join to the kickoff ch with a sl st to grade a ring.
Circular 1: Ch ane. Sc in the aforementioned st equally the sl st join. Sc in each of the next 14 sts. Join to the first sc with a sl st. {15 sc}
Round 2: Ch one. Sc in the same st equally the sl st bring together. Sc in each of the side by side xiv sts. Bring together to the first sc with a sl st. {fifteen sc}
Method
Afterward yous accept worked your foundation chain {Photo 1}, insert your claw into the starting time ch (the one uttermost away from your claw – indicated by an arrow in Photo 1 and illustrated in Photo 2) and make a sl st {Photo 3}.
Ch 1 to brainstorm the next round. Each round will start with a ch-1 to go you upwards to the height y'all demand (if y'all are using hdc or dc, please run across the Annotation below). This chain stitch does not count as a stitch if you are using sc.
If yous are going to use a RSM, lay it over your work after making the ch-1 merely before making the kickoff run up of the round {Photo 4}. At present make the commencement sc in the same st as the sl st join {Indicated with an pointer in Photo 4 and Illustrated in Photo 5}. Go along working the residuum of your stitches. When you lot get to terminate of the round, yous should have what looks like one stitch left. This is not a stitch, but rather the back-end of the sideslip sew together join. Skip this stitch AND the initial ch-1 and join to the first st (sc) with a sl st {Photograph seven}.
Photograph six shows the sl st, ch-one, and showtime sc indicated with arrows.
Continue working each subsequent round in the same style, making your first st in the same st as the sl st join and skipping the sl st join and the initial ch-1 when joining at the finish of the circular.
Retrieve to flick your Running Run up Marker backwards and forrard after each initial ch-1, taking care to notation that the RSM will hide the sew together you lot need to work into. Pull it to the side so that you can see your stitches properly.
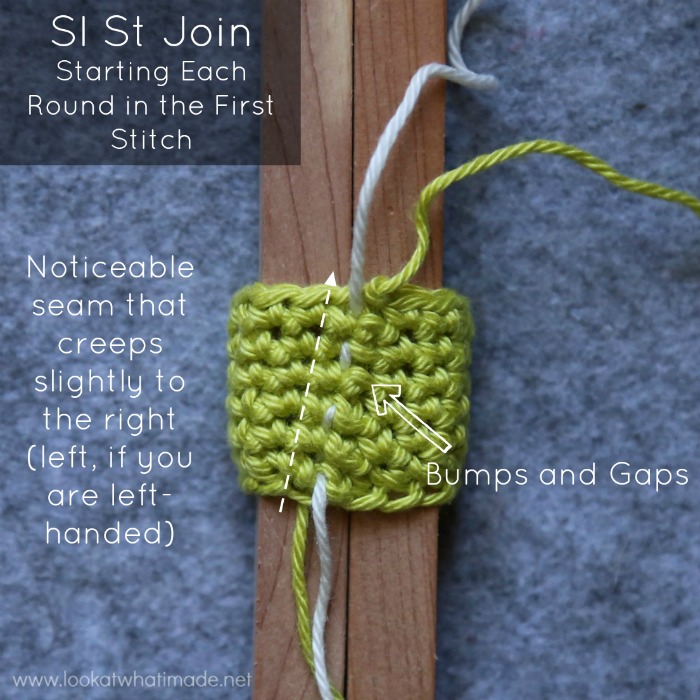
When you join in the round like this, you will get quite a visible seam that volition pitter-patter slightly to the right as your item progresses. Because you are skipping the join and the initial ch-one, your seam will be gappy, with visible bumps created by the skipped sl sts.
Note
If you are using hdc or dc, you lot volition have to consult the relevant design. Sometimes the starting chain doesn't count equally a st, in which case y'all will ignore information technology when joining the round. If it DOES count as a st, you will bring together to information technology when yous get to the end of the round, treating information technology as a hdc or dc – as indicated in the relevant pattern.
My personal preference is to make my starting concatenation 1 ch shorter than it would usually exist and have information technology not count as a sew together. For example, if I am making a dc rug, I would kickoff with a ch-2 (commonly ch-three for dc summit) and and so make my first st in the same st as the ch-2. When I become to the cease of the round, I would skip the sl st and the ch-2, and bring together to the first dc with a sl st.
Pros
Joining in the round similar this makes it piece of cake to keep rails of your stitch counts. At the stop of each round, you lot should have a st left before the st marking (this will be the joining sl st). If you lot don't accept a st left, or you have 2 sts left, it immediately flags up the fact that you have made an error, either in this circular or in the previous one.
The showtime and end of the piece of work will too exist neater than when working in a spiral.
Cons
The seam is conspicuously visible and can be an eyesore, particularly if yous change colours at the terminate of each circular.
Remedy
If you lot are only making a tube or something where the placement of your increases is not peculiarly important, yous can consider using futuregirl's method for seamless single crochet. This method involves turning the work at the terminate of every circular though, so is but suitable for things where the placement of the increases is not important! You cannot turn your piece of work on things like a shaped Amigurumi head unless the pattern specifically calls for the work to be turned.
If y'all are changing colours at the end of each round, yous might want to utilise an Invisible Join instead of a Sl st Join. I Dear the Invisible Bring together and utilise it wherever possible.
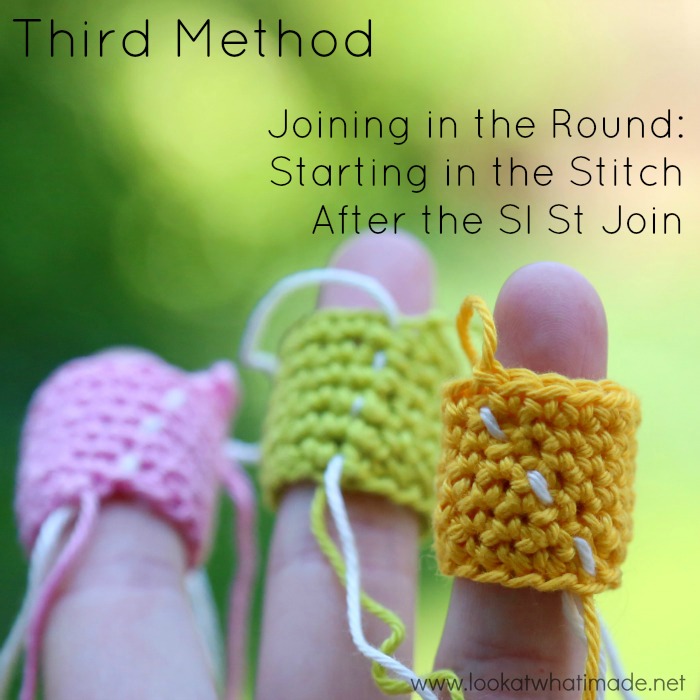
3. Joining in the Round: Starting in the Stitch Subsequently the Sl St Join
This is the method my granny taught me and I prefer it for diverse reasons. It is Not interchangeable with the other two methods AT ALL, unless y'all are only working a tube or a flat circle where the placement of the increases doesn't matter.
I use this method for my Amamani (Amigurumi Amish Puzzle Animals), specifically the rhinosaur, the elephant, the dinosaur, the horse and the giraffe.
Update 2020: For the Amamani volume, I rewrote the patterns for all but the Rhinosaur and the Equus caballus to use a spiral join instead.
 This method applies to patterns where the designer specifically expresses that the kickoff stitch should not be worked in the same st every bit the sl st bring together. You won't notice many of those!
An case of a pattern written for this method would exist:
Please annotation:for the purposes of this blueprint, do not make your first st in the same st every bit the sl st join. This will mean that your last st will fall in the back end of the sl st join, which is quite tight.
Ch 15. Bring together to the first ch with a sl st to class a ring.
Circular one: Ch i. Sc in the next 15 sts. Join to the first sc with a sl st.Think that you should not make your first st in the aforementioned st as the sl st join and that your last st will fall in the back finish of the sl st bring together. {fifteen sc}
Round 2: Ch 1. Sc in the next 15 sts. Join to the first sc with a sl st. {15 sc}
Method
Later y'all have worked your foundation concatenation {Photo i}, insert your hook into the starting time ch (the i farthest away from your hook – indicated past an pointer in Photograph 1 and illustrated in Photo 2) and make a sl st {Photograph 3}.
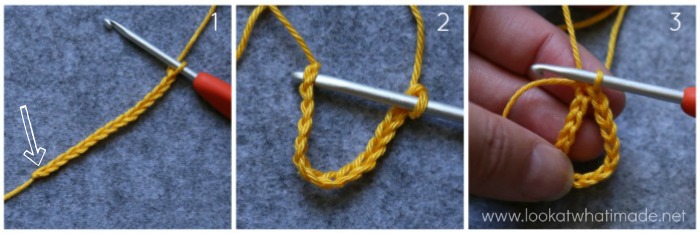
Ch i to brainstorm the side by side round. Each round volition start with a ch-1 to get you upwardly to the top yous need (if y'all are using hdc or dc, please see the Note below). This chain sew does not count as a sew together if you are using sc.
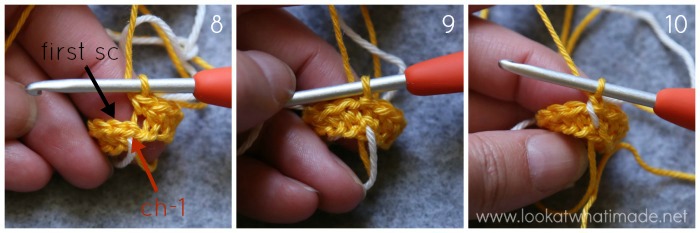
If you are going to apply a Running Sew together Marker, lay it over your work after making the ch-1 merely before making the start stitch of the round {Photo 5}. Now make the get-go sc in the st AFTER the sl st join, so the beginning open st {Indicated with an arrow in Photo 4 and Illustrated in Photo 6}. Go along working the residue of your stitches. The concluding st of the circular should exist quite tight to get into every bit information technology is the back end of the sl st join.
Photo seven shows the last st that y'all will need to work into (white pointer) as well as the initial ch-1 (crimson arrow) and the kickoff sc (black arrow).
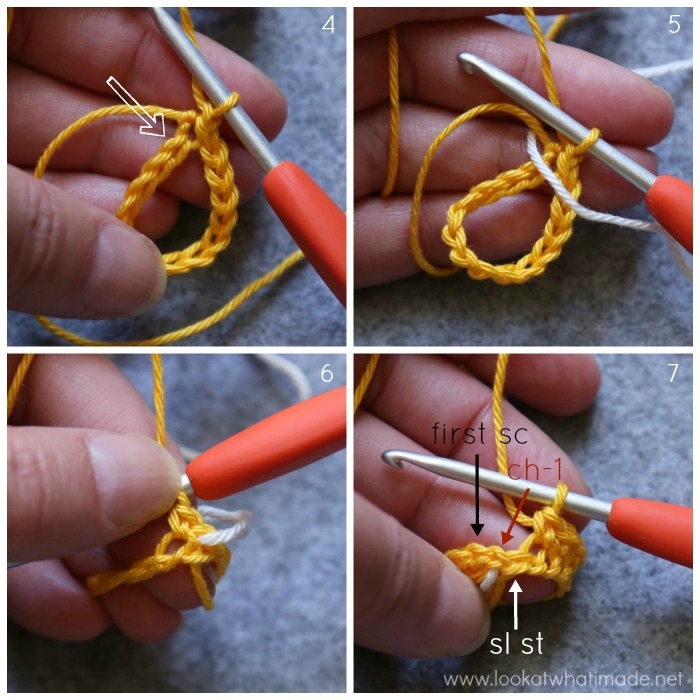
Photo 8 shows the concluding st of the round made into the back end of the sl st join. This will bring you to the initial ch-i of the round, which will autumn directly over the running stitch marking {Photo eight} . Skip this initial ch-one and join to the first st (sc) with a sl st {Indicated with a blackness arrow in Photograph 8 and Illustrated in Photo ix}.
If you are using a Running Sew together Marker, remember to motion picture information technology backwards and forward at the beginning of each round {Photo 10}.
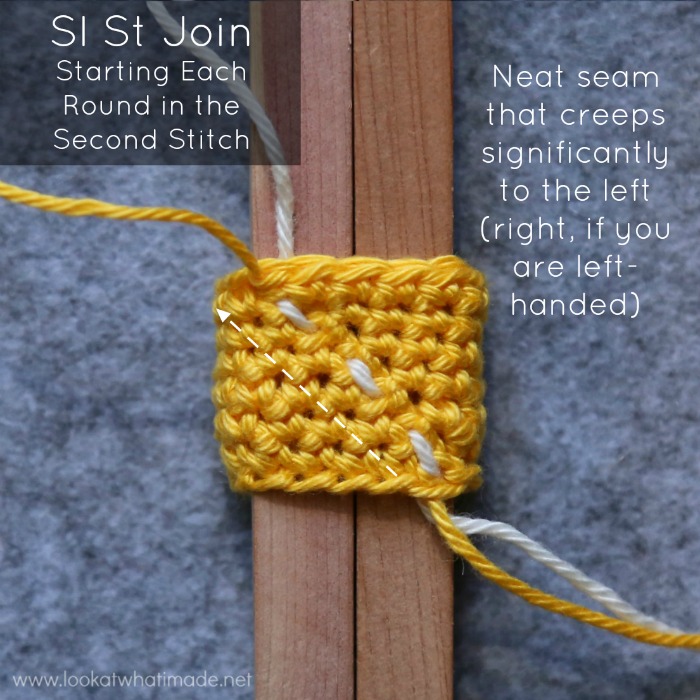
When you bring together in the circular like this, you lot will terminate up with a seam that creeps significantly to the LEFT (correct, if left-handed).
BUT
The resulting seam volition exist a lot neater than if you had started in the same st equally the sl st join.
Note
If you are using hdc or dc, y'all will have to consult the relevant blueprint. Sometimes the starting chain doesn't count as a st, in which case you will ignore it when joining the round. If it DOES count as a st, you will bring together to it when yous get to the end of the round, treating it every bit a hdc or dc – equally indicated in the relevant pattern.
My personal preference is to make my starting chain 1 ch shorter than it would normally be and accept it not count as a stitch. For example, if I am making a dc rug, I would starting time with a ch-ii (usually ch-three for dc acme) and so make my first st in the aforementioned st later the ch-2. When I get to the stop of the round, I would skip the ch-2, and join to the commencement dc with a sl st.
Pros
Joining in the round like this is Bully! The resulting seam is visible but smooth and not ugly.
The tightness of the last st y'all work into (the dorsum stop of the sl st join) acts as an extra prompt that you lot have indeed worked all your stitches correctly.
If the final run up I work into is not tight, it prompts me to cheque all the stitches in my round. It can be indicative of a mistake in the current round or the previous one.
Cons
This method is not interchangeable with the other 2 methods (unless you are purely working a tube or a flat circle). Because the first sew together of every round creeps to the left in this method and to the right in the others, it will cause massive problems if you are working a shaped object like an Amigurumi caput.
If a pattern is written to be worked in a spiral or calls for the commencement stitch to be made in the aforementioned sew as the sl st join, using this method instead will place the increases in a completely different spot. This won't exist so noticeable on the starting time round, but the more rounds you have, the more your increases will be offset from where they should be.
It can get ugly very fast!
Remedy
None, unfortunately. Employ this method merely if a pattern calls for information technology specifically! Or be prepared to exercise a lot of maths to re-write the design.
Interchanging Methods
As I have already mentioned, the Spiral Technique and the First Technique for joining in the round (making your beginning st in the same st as the sl st join) are completely interchangeable as the first st of each round for both of these creeps steadily to the correct at more or less same angle.
If you want a completely direct seam, futuregirl's seamless single crochet tutorial offers you the best pick, simply you will have to plow at the end of each round. This means that you cannot interchange this method with any of the three I mentioned UNLESS you are just working a tube (like an octopus tentacle) or a apartment circle (like a coaster or a Round Rag Rug) where the position of the increases doesn't matter as much.
My favourite by far is the Second Method for joining in the circular where you make your first st in the st subsequently the sl st bring together. But this method, like future daughter's method, is non interchangeable with whatever of the other methods if in that location is whatever shaping involved. Like I have already said, the seam for this method creeps significantly to the left. And so if you lot used this method where any of the other methods were chosen for, you'll end up with a very lopsided item. You can, however, apply it in patterns where there are no increases or the placement of the increases doesn't matter as much.
Phew! What a mouth total.
I promise you have found this tutorial helpful and would love to hear from you if you have (or even if you haven't). Exercise yous have a different arroyo to joining in the circular? Or possibly you have a hint that makes working in the round easier.

This blog post contains chapter links. I only link to products I personally use or would utilise. All opinions are my own.

Source: https://lookatwhatimade.net/crafts/yarn/crochet/crochet-tutorials/how-to-crochet-in-the-round-spiral-vs-joining/
0 Response to "How To Join In The Round Crochet"
Post a Comment